
PowerSeek Documentation
web hosting plans - purchase domain names - advertising options
PowerSeek
Documentation >> 8. The User Manager  |
PowerSeek
Manual Index 1. Installation 2. The basics in 20 minutes 3. Settings 4. The Directory Manager 5. Front Page Setup 6. Customization (Look & Feel) 7. Static / Dynamic Directory 8. The User Manager 9. Maintenance 10. Premium Links 11. Plugins 12. How To's, Tips & Tricks |
|
<< Previous Page How to run a static or dynamic directory. |
Index |
Next Page >> Maintenance. |
|
|
8. The User Manager |
8.1 What is the User Manager?
8.2 How to enable the User Manager (Requiring registration or user accounts for link submissions)
8.3 How to disable the User Manager (Not requiring registration or user accounts for link submissions)
8.4 User Extra Fields/Keys (Collecting Extra Information when users register accounts)
8.5 Sending Email to users
![]()
 |
You will only use the User Manager if the user registration system is turned on. When the User Registration System is turned on then users are required to register an account to be able to submit links. This has the advantage of practically making your Search Engine & Directory spam proof to spammers and spam submission services because Email Validation is required when registering an account. (Note that the Email Validation setting can be turned off in versions 3.2 and up in the Control Panel >> Settings >> Global Engine Settings >> 5. New Submission Settings)
There is also an added benefit where Submitters has their own Control Panel where they can modify their links or update their contact or registration details. Users may also add more than one link to their account which makes it easy to keep track of links.
You can use the User Manager to browse user accounts, log into user accounts and search through user accounts.
![]()
PowerSeek Ver 3.x comes with the user registration enabled by default. To enable User Registration go to the Control Panel >> Settings >> Global Engine Settings >> 5. New Submission Settings - Look for the setting that reads: 'Would you like to use the user registration system?' - Set it to 'Yes'.
Note that the User Registration System uses it's own set of Add URL and Modify templates. If you don't use the User Registration System then other templates are used for the Add URL and Modify Forms. When you go to the Template Manager in the Control Panel then the Add URL and Modify templates will be displayed for editing according to the user registration setting available in the Control Panel >> Settings >> Global Engine Settings >> 5. New Submission Settings
If you did not use the User Registration System previously and switched to the User Registration system then you will need to customize the new Add URL and Modify templates that will be used. There are also extra templates that will need customization like the Login templates, User Registration templates, etc. These templates are all listed when you go to the Control Panel >> Template Manager >> 3. Add URL Templates
![]()
 |
You can disable the requirement where users need to register an account to be able to submit a link by going to the Control Panel >> Settings >> Global Engine Settings >> 5. New Submission Settings - Look for the setting that reads: 'Would you like to use the user registration system?' - Set it to 'No'.
When the above mentioned setting has been set to 'No' then no registration is required by visitors to be able to submit links. When visitors click the 'Add URL' buttons or links they will then be presented with the Add URL forms to submit links. This method of accepting new submissions might be faster than using the user registration system but your Search Engine & Directory will be more vulnerable to spam submissions.
Note that different Add URL and Modify templates are used when the user registration system is disabled. If you used the user registration system previously then you will need to customize the new Add URL and Modify templates that is used when the user registration system is disabled. You can customize the new templates that is used by going to the Control Panel >> Template Manager >>3. Add URL Templates
Also note that you will need to edit the the templates mentioned below to add a 'Modify' link to each link listing so that users can modify the links. (Because a user control panel will not be used anymore as the User Registration System is turned off)
Go to the Control Panel >> Template Manager >> 1. Default Category/Directory Templates
Now Edit: 'Links Style' and 'Premium Links Style' Templates and add the following HTML code to it:
<a href="!!modify_link!!">Modify</a>Go to the Control Panel >> Template Manager >> 2. Search Result Templates
Now Edit: 'Links Style' and 'Premium Links Style' Templates and add the following HTML code to it:
<a href="!!modify_link!!">Modify</a>Go to the Control Panel >> Template Manager >> 6. What's New Templates
Now Edit: 'What's New Listings Style' and 'Whats New Listings Premium Style' Templates and add the following HTML code to it:
<a href="!!modify_link!!">Modify</a>Go to the Control Panel >> Template Manager >> 7. Top Hits Templates
Now Edit: 'Top Hits Listings Style' and 'Top Hits Listings Premium Style' Templates and add the following HTML code to it:
<a href="!!modify_link!!">Modify</a>Go to the Control Panel >> Template Manager >> 9. Favorites
Now Edit: 'Favorites Link Style' and 'Favorites Premium Link Style' Templates and add the following HTML code to it:
<a href="!!modify_link!!">Modify</a>
![]()
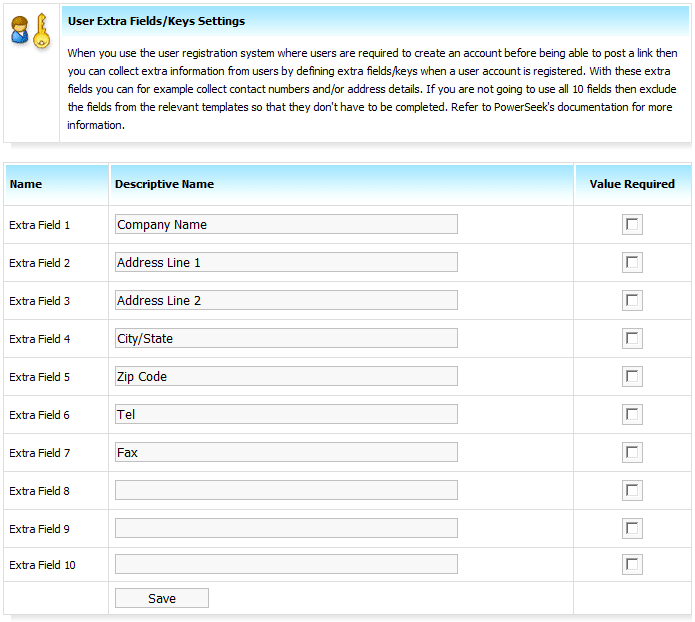 |
Note that these settings are only used when the User Registration System is enabled. These settings enables you to collect extra user information when users register accounts to be able to submit links. To collect extra information or records from users when they register accounts go to the Control Panel >> Settings >> User Extra Fields/Keys Settings
A popup window will appear and you will now see fill-in-boxes with accompanying names. The names are: Extra Field 1, Extra Field 2, etc. Supply a descriptive name for each extra field you require for any extra information you want to collect from users registering accounts. To the right next to each entry there is a 'Value Required' check box. If you check this box then the user will be required to supply data in the specific field when he/she registers an account.
Fill the boxes from top to bottom. If you only require to collect data for 4 extra fields for example then leave the rest of the fill-in-boxes blank.
After you filled in the descriptive names of the extra fields and checked the check boxes of values required (if required) then click the 'Save' button.
Now go to the Control Panel >> Template Manager >> 5. User Registration System Template Plug-In's >> Click on 'New User Registration (rgs_register.html) to edit the user registration template. This is the page/template that will be displayed to users that register accounts.
Let's say that you defined 4 extra fields for example. In this case you will add the following to the registration form of the template:
Company Name: <input type="text" name="extra1" size="32" value="!!extra1!!">
City: <input type="text" name="extra2" size="32" value="!!extra2!!">
Country: <input type="text" name="extra3" size="32" value="!!extra3!!">
Telephone: <input type="text" name="extra4" size="32" value="!!extra4!!">The fill in box for Company name is called extr1 and it's value is !!extra1!!
The fill in box for City is called extr2 and it's value is !!extra2!!
etc.The registration template could then look something like this:
| <html> <head> <title>Register</title> </head> <body> <form method="POST" action="!!rgs_register!!"> <input type="hidden" name="fct" value="register"> Choose a User Name: <input type="text" name="rgs_user" size="13" value="!!rgs_user!!"><br> Choose a Password: <input type="password" name="rgs_pass" size="13" value="!!rgs_pass!!"><br> Verify Password: <input type="password" name="rgs_pass2" size="13" value="!!rgs_pass2!!"><br> Name: <input type="text" name="name" size="32" value="!!name!!"><br> Email: <input type="text" name="email" size="32" value="!!email!!"><br> Confirm Email Address: <input type="text" name="email2" size="32" value="!!email2!!"><br> Company Name <input type="text" name="extra1" size="32" value="!!extra1!!"><br> City <input type="text" name="extra1" size="32" value="!!extra1!!"><br> Country <input type="text" name="extra1" size="32" value="!!extra1!!"><br> Telephone: <input type="text" name="extra1" size="32" value="!!extra1!!"><br> Subscribe to NewsLetter: <input type="checkbox" name="mlist" value="Y" checked><br> <input type="submit" value="Create Account" name="B1"> </form> </body> </html> |
![]()
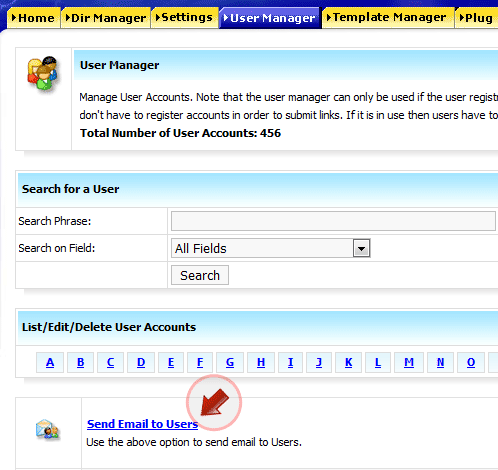 |
To send email to users, go to the Control Panel >> User Manager >> Send Email to Users - After clicking on 'Send Email to Users' a popup window will appear. Fill in the form. Below are details of the fields you need to complete:
From Email Address
This is the email address from which you will be sending email to users that has user accounts.From Name
The email will be sent from this name. You can specify your name or company name here.Subject
This will be the subject of the email.Message
This will be the email message that will be sent to users that owns user accounts. You can personalize this email by using variables inside the message.You may use the variables (words) as listed below inside the email message. It will be replaced by for example: the names and details of the users you are mailing. The %%extrafieldX%% variables will be replaced by the extra field data for User Accounts. For more on extra fields for User Accounts see: 8.4
%%username%%
This will be replaced by the user name of the user account.%%password%%
This will be replaced by the password of the user account.%%name%%
This will be replaced by the user's name.%%extrafield1%%
%%extrafield2%%
%%extrafield3%%
%%extrafield4%%
%%extrafield5%%
%%extrafield6%%
%%extrafield7%%
%%extrafield8%%
%%extrafield9%%
%%extrafield10%%
Only send this email to users that has the chosen to subscribe to your newsletter.
Check this tick box to only send email to users that checked the 'subscribe' tick box when they registered a user account. Users can un-tick this box by editing their account details when they are logged into their account.Number of Emails to Send at a Time
The mailer will only send this specified amount of emails at a time. Setting this value too high might overload your mail server. Sending only a limited amount of email messages at a time will avoid overloading of the mail server.Sending a Test Email
You can fill in this field with your own email address to send yourself a test message to see how the message will look like when users receive it. When you send yourself a test email then no users will receive the message. The message will only be sent to yourself.
|
<< Previous Page How to run a static or dynamic directory. |
Index |
Next Page >> Maintenance. |
Last Updated: Monday September 08, 2025