PowerSeek Documentation
web hosting plans - purchase domain names - advertising options
| PowerSeek Documentation >> 2. The basics in 20 minutes
|
PowerSeek Manual Index 1. Installation
|
| << Previous Page Installation. |
Index | Next Page >> Settings (After Installation). |
| 2. The Basics in 20 Minutes |
There is now a special Startup Wizard available with PowerSeek. It has less text than this guide and is easier to follow and is interactive. You can start the Wizard by logging into your PowerSeek Control Panel. Then click on: 'Startup Wizard - For New Users'
We are still including the startup guide in this section. You are welcome to go through it if you don't want to use the Startup Wizard provided with PowerSeek.
PowerSeek should be very easy to use and is mostly self-explanatory. Please read this guide as it will save you time. This section has been written to get you started in the shortest time possible. It provides you with the basics of creating your Directory & Search Engine. It will also give you a good feel of how everything works together.
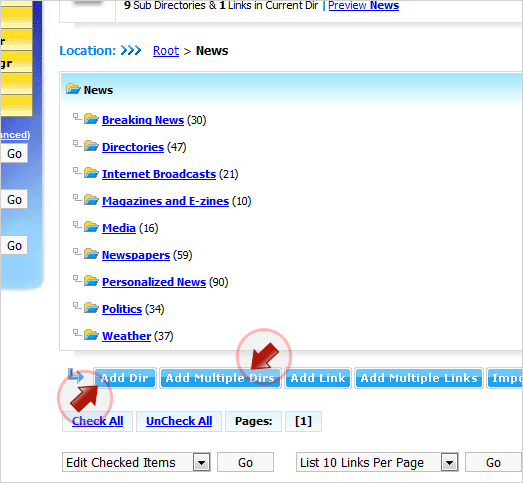
Step 1 of 3. Create your Category/Directory Structure and Add Links.
Your Directory Structure is the Categories you would like to place links in. You can create your Directory Structure by going to the PowerSeek Control Panel. Then click the 'Dir Manager' tab button. Once you are in the Directory Manager, click on the 'Add Dir' button to add categories or also referred to as 'directories'. Once categories/directories has been added, click on their names to enter them. Once you enter a category/directory, you can add links to the category/directory by clicking the 'Add Link' button.
Note that you can also add multiple categories/directories at a time by clicking the 'Add Multiple Dirs' button. You can also add multiple links at a time by clicking the 'Add Multiple Links' button.
Experiment by adding Directories and Links, Moving Links, etc. You can also preview the Directories/Categories by clicking the ‘Preview’ link next to each Directory/Category in the ‘Dir Manager’
 |
See the following for more detailed information on category/directory and link creation:
- 4. The Directory Manager
- 4.13.2 ODP Link Importer
- 4.15 Crawling for titles, descriptions and keywords
Additional Note: You can always add extra fields to collect/add extra information or data to links like addresses, telephone numbers, extra descriptions, etc. You can find out how to do this by adding extra fields. This is explained here:
3.6 Extra Field/Key Settings
Step 2 of 3. Create/Setup the Front Page of your Directory
Note that there are other methods for setting up your Front Page but for this Startup Guide we will use the most basic and easiest method.
To set up the Front Page of your Directory with this method follow the following instructions:
1. Go to Front Page category configuration:
Go to the PowerSeek Control Panel >> Template Manager Tab >> Click on: Create/Configure Front Page. A popup window will open. Then click on: 1. Setup/Configure Front Page. Now from the options listed select the IFRAME Tags option and click the Next button. The next screen will display options that you can change to configure the look and feel of categories that will be displayed on the 'Front Page' of your Directory. Change any options and click the 'Next' button.
Watch Video demonstrating this step.
2. Place HTML code inside Front Page
You will now be presented with two boxes. The one box contains HTML code that you need to insert into a web page of your web site or the front page of your web site. (The front page of your domain like http://www.yourdomain.com/docs.html for example) - If you don't have an docs.html file then create one with your web editor containing your logo's, menu's, texts, front page greeting, etc. You will place the web page you create here for example: http://www.yourdomain.com/docs.html
Copy and paste the HTML code into the web page that will act as your front page. (http://www.yourdomain.com/docs.html for example) Place the HTML code where you want the main categories of your Directory to display.
The second box contains HTML code for the Search Box of your Search Engine. Also place this inside the web page that will act as your front page. (The front page of your domain called http://www.yourdomain.com/docs.html for example)
From where you got the IFRAME Tag HTML code and Search Box HTML code there is also a help option at the bottom listing the links to the various PowerSeek functions. It will provide you with links to the 'What's New', 'Popular', 'Login', etc. pages. Also create or place these links inside your Front Page. (the front page of your domain called http://www.yourdomain.com/docs.html for example.)
Watch Video demonstrating this step.
3. Upload Front Page
By now you should have an HTML file called docs.html for example and you should have placed the IFRAME HTML code and Search Box HTML code inside it. Now upload it to your web site so that it can be accessed from:
http://www.yourdomain.com/docs.html for example.Load the file you uploaded (http://www.yourdomain.com/docs.html for example) inside your web browser and you will see the categories of your Directories displayed where you placed the IFRAME Html code. You will also see the Search Box where you placed the search box HTML code.
Watch Video demonstrating this step.
Notes:
- You can always change the Look and Feel of categories listed inside your Front Page by going to the Control Panel >> To Do >> Generate Front Page >> 1. Setup/Configure Front Page >> Choose the 'IFRAME' method
Step 3 of 3. Implementing a Global Template
PowerSeek uses HTML templates for the look and feel of your Search Engine & Directory. The templates can also be thought of as skins. All aspects of the templates can be customized to your liking. You can use any type of design. Note that PowerSeek uses no HTML code of it's own. It relies on the HTML code obtained from the templates to put everything together that end users see. The templates are ordinary HTML files.
You can edit all templates used for all end-user-functions PowerSeek provides by going to the PowerSeek Control Panel >> Template Manager
In this section we will implement a global template. What this means is that we will upload a master template (normal HTML file) that will replace all PowerSeek templates with the look and feel of the 'master template'. If the function of implementing a Global Template was not available then all individual templates used by PowerSeek would have to edited. You are however welcome to not implement a Global Template and edit all templates individually by going to the Control Panel >> Template Manager. In some situations and very specialized Directories it might be more practical to edit all templates individually by going to the Control Panel >> Template Manager.
To implement a Global Template go to the PowerSeek Control Panel >> Template Manager >> Implement Global Template and follow the instructions provided to you.
Notes on Template Editing:
After you implemented a Global Template you might want to edit some individual templates to change the look and feel for some functions like the 'Login Screens', 'Registration Screens', 'Link Listing Styles', 'Add URL Screens', 'Category Listing Pages', etc. To edit templates see the following:
The Template concept in a few short words:
The templates that is used by PowerSeek is just ordinary HTML files. The only exception is that the templates or HTML files contains variable words that PowerSeek uses for pointers where it needs to place data. You can basically open the HTML files with your favorite web editor or with what ever you prefer and edit away. Some templates use other templates in combination with each other. In other words, some templates combine into each other to form an entire page.
To edit the PowerSeek templates, go to the Control Panel >> Template Manager >> then click on any of the following options:
1. Default Category/Directory Templates
2. Search Result Templates
3. Add URL Templates
etc.When you click on: '1. Default Category/Directory Templates' for example the box will expand providing you with a template names that you can click to edit the particular templates. You can also preview the page for what particular templates is used by clicking the 'preview' link next to the template names.
How to edit the templates:
You can edit the templates from the Template Manager. To go to the Template Manager, go to the Control Panel. Then click the 'Template Manager' tab. Click on any of the template links in the Template Manager to edit templates. (They are listed from numbers: 1-10)
Templates can be edited by copying and pasting the HTML code directly into your web editor when editing templates from the Template Manager. Once you have changed the template contents, you may copy and paste it back into the edit box and save it.
You may also open the template files directly with your Web Editor to edit them. The templates are stored inside your PowerSeek ‘data’ directory.
What is the variable words in the templates/HTML files?
The variable words are enclosed by !! or %% characters. Examples of such variable words are:
%%date%% or %%pages%% etc...
These variable words are replaced by chunks of data supplied by PowerSeek when users browse your Search Engine & Directory. The location of the variables in the HTML template acts like pointers where PowerSeek substitutes the variable words with data. In some cases templates are combined with each other via these variable words.
For example:
%%date%% is replaced by the date of a link listing and %%pages%% are replaced by the number of pages that contains link listings, etc...
Note: It is very important that most of these variable words are present in your templates. Without them your Search Engine & Directory may not function correctly. Only remove variable words if you know what they do.
Template Customization Example – Default Directory Template Customization Explanation
This section explains how to customize the Default Category/Directory Templates. The Default Category/Directory Templates are used when displaying categories with links.
You can customize the Default Directory Templates by going to the Template Manager in the Control Panel. Then click on '1. Default Category/Directory Templates'.
Explanation of each HTML file or template used in the Default Directory/Category Template Set :
Main Category/Directory - defdir.html
This is the main template used when displaying the links/contents of your Categories or Directories.
This template and tmplsearch.html, tmplsearch_prem.html, subdirs.html, directories1.html, related1.html and related2.html is combined to form a category page.
Links Style - tmplsearch.htmlThis template is used in conjunction with defdir.html - It is substituted by the %%searchresults%% variable in defdir.html - In other words, %%searchresults%% is replaced by the HTML code of tmplsearch.html in defdir.html
This template indicates the actual style of the link listings. The HTML code for this template is repeated for each link that is displayed in a Category.
Note that <html> and <body> must not be present in this template.
Premium Links Style - tmplsearch_prem.html
This template basically does the same thing that tmplsearch.html does, but it is only used for premium listings so that premium listings can have a different look or appearance.
Note that <html> and <body> must not be present in this template.
Sub Categories/Directories Style 1 - subdirs.html - Sub Directories/Categories Style 1This template is used in conjunction with defdir.html - It is substituted by the %%subdirectories%% variable in defdir.html - In other words, %%subdirectories%% is replaced by the HTML code of subdirs.html in defdir.html
The HTML code of subdirs.html is used for displaying sub categories/directories of the current category/directory when browsing the directory.
Note that <html> and <body> must not be present in this template.
Sub Categories/Directories Style 2 - directories1.html - Sub Directory Link Style 2This template is used in combination with subdirs.html - The function of this template is the actual style of each sub directory/category displayed. You can add a graphic next to each subdirectory in this template.
The variable %%substyle%% that is used in this template is replaced by actual category/directory names.
Let's say you want to add a graphic next to each category displayed. Then the contents of directories1.html would look something like this for example:
<img src="http://www.yourdomain.com/smpdirl.gif"> %%substyle%%
Note that <html> and <body> must not be present in this template.
Related Categories/Directories Style 1 - related1.htmlThis template is used to display related directories/categories for the existing directory/category. This template is used in combination with defdir.html
It is substituted by the %%related%% variable in defdir.html - In other words, %%related%% is replaced by the HTML code of related1.html in defdir.html
Related Categories/Directories Style 2 - related2.html
This template is used in combination with related1.html - The function of this template is the actual style of each related category/directory displayed.
Link Info - linkinfo.html - Extra link information template for standard links
This template is used to create an individual page for each standard link in your Directory. This means that each link can have it’s own page.
If the variable !!more_info_url!! is present inside tmplsearch.html or tmplsearch_prem.html then each link displayed in your directory will have a link to an extra page where more link information can also be displayed for example. You can for example display more extended information about the link on the extra page. The extended information could be contained in extra data fields.
Link Info Premium - linkinfop.html - Extra link information template for premium linksThis template is used to create an individual page for each premium link in your Directory. This means that each premium link can have it’s own page.
If the variable !!more_info_url!! is present inside tmplsearch.html or tmplsearch_prem.html then each link displayed in your directory will have a link to an extra page where the link information can also be displayed. You can for example display more extended information about the link on the extra page. The extended information could be contained in extra fields/keys.
You can find out more about premium links here:
Chapter 10. Premium Links
General Template Guidelines
A lot of the templates work in combination with each other and others work independently where they are not combined with other templates.
The rest of the templates work in more or less the same manner as explained here. The moment you open (with your web editor) a template you should know or have a good idea where it is to be used.
Probably the easiest and best way to know exactly how the templates work is to experiment and play around with them. If something went wrong and your Directory doesn’t seem to be working anymore because of template problems, you can just go back to the default templates that were present when you first installed PowerSeek. You can go back to the original templates by clicking the ‘Restore Default’ button when editing templates from the ‘Template Manager’.
Also look carefully at the templates that was present when PowerSeek was first installed to get a good idea of how they work and what each variable word does. You can find these in the .zip installation file.
See the following for more detailed information on template customization:
Chapter 6. Customization (Look & Feel)
| << Previous Page Installation. |
Index | Next Page >> Settings (After Installation). |
Last Updated: Monday September 08, 2025