
PowerSeek Documentation
web hosting plans - purchase domain names - advertising options
PowerSeek Documentation >> 9. Maintenance  |
PowerSeek Manual Index 1. Installation 2. The basics in 20 minutes 3. Settings 4. The Directory Manager 5 . Front Page Setup 6 . Customization (Look & Feel) 7 . Static / Dynamic Directory 8 . The User Manager 9 . Maintenance 10. Premium Links 11. Plugins 12. How To's, Tips & Tricks |
| << Previous Page The User Manager |
Index | Next Page >> Premium Links |
 |
9. Maintenance |
9.1 New Submissions
9.1.1 Medium-Sized and Large-Sized Search Engines Add URL Forms
9.1.2 Premium and Standard Submissions
9.1.3 How to Approve/Reject New Submissions
9.2 How to approve changes to modified links
9.3 How to approve or reject new link reviews/comments
9.4 How to manage broken links
9.5 Generating HTML files
9.6 Generating Your Front Page (Index Page)
9.7 Recounting Links
9.8 Removing dead HTML files. (Clean-up)
9.8.1 How to run the clean up utility from from Telnet/SSH
9.8.2 How to run the clean up utility on a scheduled basis via Unix CRON
9.9 Database Maintenance
![]()
 |
New Submissions take place when end-users add URL's via the Add URL forms. The administrator has to approve new submissions for it to be visible in the Search Engine & Directory. To approve new submissions go to the Control Panel. Then click the ‘To Do’ tab. Now click on the ‘Approve/Edit New Submissions’ link.
9.1.1 Medium-Sized and Large-Sized Search Engines Add URL Forms
There are two types of Add URL forms available for use. You can use the Medium-Sized or Large-Sized Search Engines Add URL Forms. The differences between the two are as follows:Medium-Sized Search Engines Add URL Forms
The 'Add URL' form for Medium Sized Search Engines, is recommended for Search Engines that is using less than 5000 Directories/Categories. The Directory Tree (when submitting a URL) is available as a dropdown box in the Add URL form. This means that end-users do not have to browse to a directory/category and click the 'Add URL' button or link to add a URL to a specific category.
Large-Sized Search Engines Add URL Forms
The Add URL form for Large Sized Search Engines is recommended for Search Engines that are using more than 5000 Directories/Categories. The Directory Tree is not available as a dropdown box in the Add URL form when doing a new submission. Users have to go to the category where they would like to submit a new URL and then click the Add URL link.
To choose what ADD URL forms or templates should be used (Medium or Large), go to the Control Panel. Then click on the Settings tab. Now click the ‘Global Engine Settings’ link and in the popup window that appears click '5. New Submission Settings'. Look for a setting that reads: ‘What 'Add URL' form will you be using?’
You can edit the templates of the Add URL forms you are going to use from the Template Manager in the Control Panel. An indication of what Add URL forms are in use (large or medium sized) will be available in the Template Manager. The indication will have text displayed next to the templates that reads: ‘In use’ or ‘Not in use’.Also See:
12.7.1 How to block automated submission services and spammers from using the 'Add URL' forms.
12.7.2 How to block automated submission services and spammers from using the 'Comments' forms.9.1.2 Premium and Standard Submissions
There are two types of submissions that can take place. Standard and Premium submissions can be made. All premium submissions will be indicated in the ‘New Submissions’ section when approving new submissions. Premium submissions will always be listed first in the list of submissions when viewing new submissions that needs to be approved.
For more on premium submissions, see:
10. The Premium Links9.1.3 How to Approve/Reject New Submissions
To approve new submissions go to the Control Panel. Then click the ‘To Do’ tab. Now click on the ‘Approve/Edit New Submissions’ link.
Also see:
3.3.1 New Submission Emails
10.1.5 New Premium Submission Emails
![]()
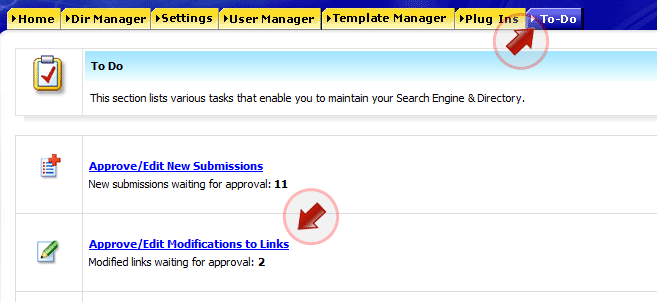 |
The original links are still available in their original state once an end-user has made changes/modifications to his/her link until the Administrator has approved the changes.
To approve changes to links that end-users has made via the Modify feature, go to the Control Panel. Now click on the ‘To Do’ button. Now click on the ‘Approve/Edit Modifications to Links’ link.
![]()
 |
Each link has the ability to store comments/reviews about it. The reviews/comments can be added by end-users.
New reviews/comments are placed in a que when a new review or comment about a link has been posted. The Administrator has to approve the reviews/comments before they will be available for display with their respective links.
To approve or reject a new review, go to the Control Panel. Then click the ‘To Do’ tab. Now click on the ‘Approve/Edit Comments’ link.You can also browse/edit/delete reviews by going to the Control Panel >> Plug-In's >> Comment/Review Editor
![]()
PowerSeek comes with the ability, where end users are able to report broken links. To manage the links that has been reported as broken, go to the Control Panel. Then click on the ‘To Do’ tab. Now click on the ‘Manage Reported Broken Links’.
Also See:
11.7.2 The Broken Link Checker
![]()
You will have to generate HTML files regularly to keep your directory updated if you run a Static Directory. When changes are made to your Directory, new HTML files need to be generated or existing HTML files updated.
To generate/update HTML files, see:
7.1 How to run a static directory
![]()
If you make any changes to the main Directories and the sub directories of the main directories/categories, you will need to update your front page. (You don't need to do this if you use the Template method for your front page) Your front page is automatically updated when you generate HTML files or Update HTML files.
Also See:
5 . Front Page Setup
![]()
Each category/directory has link counts that indicates the entire amount of links inside it. In rare situations the counts may go out. To recount links go to the Control Panel >> To Do >> Generate HTML files >> Recount Links
Tip: Only recount links if you are indicating subdirectory link numbers (those in brackets next to category names) in your templates.
There is no need to have it re-counted if you are not indicating the number of links in categories.
It is recommended that you recount links from telnet/ssh if you have more than 80 000 links. To recount links via telnet/ssh execute recountlnks.cgi in a telnet/ssh session. For example:
![]()
This function enables you to remove dead link pages (not broken links) and directories that is not in use anymore.
When you rename categories, the directory/category names change. In such an instance new directories are created with new files when you generate HTML files. The old directories that are not used anymore will stay behind.To remove dead HTML files go to the Control Panel >> To Do >> Generate HTML Files >> Clean-Up
This clean-up utility looks at what categories you have an removes dead directories that is not in use, residing in your 'html' directory. (The 'html' directory is the directory where files and directories are placed when HTML files are generated.) The clean-up utility also helps you conserve disk space. Run the clean-up utility every once in a while.
Caution (IMPORTANT!): Do not use the clean-up utility if you are storing web pages and images, etc. that is not files generated by PowerSeek inside the Directory where PowerSeek places generated files and directories. This means that you should not put anything in the 'html' directory other than what PowerSeek places in it. The 'html' directory is the directory where PowerSeek places generated HTML files in.
Caution (IMPORTANT!): Never set the PowerSeek 'html' directory to be the root directory of your Public HTML directory. The 'html' directory has to be in a sub directory of your Public HTML directory. Setting PowerSeek to use the root of your Public HTML directory as it's directory to store generated HTML files in, can result in data loss when using the clean-up utility. Directories that is not part of PowerSeek can be deleted with it's contents.
9.8.1 How to run the clean up utility from from Telnet/SSH
You can also run the clean-up utility from from a Telnet or SSH session. To run the clean-up utility from Telnet/SSH, telnet/SSH into your server/hosting-account. Go to the directory where clean.cgi resides in. clean.cgi is located in the ‘admin’ directory where the admin cgi script files resides.
From the Telnet/SSH command prompt, type in:
perl clean.cgi clean9.8.2 How to run the clean up utility on a scheduled basis via Unix CRON
You may use the Unix Cron program to run the clean-up utility on a daily or weekly schedule. You can configure the schedule with the Unix Cron program.
You will have to know how the Unix Cron program works. Note that you cannot just execute clean.cgi with the Unix Cron program. The reason for this is that clean.cgi needs the working directory to be the directory in which it resides.
To make the directory in which clean.cgi resides in, the working directory, you can create a Unix shell script, (Almost like a dos batch (.bat) file) that executes clean.cgi
The shell script should look something like this:
cd /home/yourdomain/www/cgi-bin/admin # Change to clean.cgi's working dir
perl clean.cgi clean # Execute clean.cgi
Note that a shell script is a normal text file that you create and upload to your web host or server. Also note that you will most likely need to assign executable permissions to it (permissions of 755)
![]()
From time to time database errors can occur. You can find out more about why these errors occur here. Use PowerSeek's repair facilities as explained below, to keep your database in good shape. There are also many alternatives which you can use - Many host providers will provide you with tools like MyPHP Admin that also has table repair utilities which you can use to repair your tables. You can also directly repair your tables with MySQL.
9.9.1 Database Repairs for Small/Medium sized search engines
You can check your tables and have them repaired by going to the PowerSeek Control Panel. Once in the Control Panel click the 'To Do' tab. Now click on the link that reads 'Generate HTML Files'. A popup window will appear. Click the link that reads 'Database Repair Kit'.
After you clicked the 'Database Repair Kit' link, checking and repairs (if needed) will be done on the database tables that is used by PowerSeek.
9.9.2 Database Repairs for Large sized search engines
It is highly recommended that you do database repairs from SSH or Telnet if you have many tens or hundreds of thousands of links present in your database. To check and repair (if repairs are needed) your database tables from Telnet or SSH, do the following:
Log into your server via Telnet or SSH.
Change to the directory where the PowerSeek admin cgi script files reside.
Execute dbrepair.cgi from an SSH or Telnet session as follows:
perl dbrepair.cgi repair
It may take hours for very large Search Engines with tens of thousands or hundreds of thousands of links. For very large Search Engines (hundreds of thousands of links / millions) we recommend that you use MySQL's myisamchk.
| << Previous Page The User Manager |
Index | Next Page >> Premium Links |
Last Updated: Monday September 08, 2025