
PowerSeek Documentation
web hosting plans - purchase domain names - advertising options
PowerSeek Documentation >> 6
. Customization (Look & Feel)  |
PowerSeek Manual Index 1. Installation 2. The basics in 20 minutes 3. Settings 4. The Directory Manager 5 . Front Page Setup 6 . Customization (Look & Feel) 7 . Static / Dynamic Directory 8 . The User Manager 9 . Maintenance 10. Premium Links 11. Plugins 12. How To's, Tips & Tricks |
| << Previous Page Front Page Setup |
Index | Next Page >> How to run a Static or Dynamic Directory. |
6. Customization (Look & Feel) |
6.1 How to Implement a Global Template
6.2 Template Customization Basics
6.3 Template Basics
6.4 How to edit templates
6.5 What is the variable words in the templates/HTML files?
6.6 How to use images in templates
6.7 Default Directory Template Customization Explanation
6.8 General Template Guidelines
6.9 How to use template includes
6.10 Global Variables (Variables available to all templates)
6.11 How to use custom directory templates
6.11.1 How to create custom template sets
6.11.2 How to assign custom templates to directories/categories
6.12 Customizing The Category/Directory Templates
6.13 Customizing The Search Results Templates
6.14 Customizing The Add URL Templates
6.14.1 User Registration Add URL & Modify Templates
6.14.2 Standard Add URL& Modify Templates
6.15 Customizing The Rating Templates
6.16 Customizing The Review Templates
6.17 Customizing The What's New Templates
6.18 Customizing The Top Hits Templates
6.19 Customizing The Broken Link Templates
6.20 Customizing The Mailing List Removal Templates
![]()
 |
Short explanation of what a Global Template Implementation does:
This functionality has been created to rapidly implement any design containing your logo, graphics, headers, footers, CSS, etc. so that all PowerSeek functions and options takes on your own original look and feel. If you have a template or design ready then this can be implemented within minutes so that all PowerSeek functions end users see contains your own branded look and feel or design.
Customizing all individual templates used by PowerSeek can be time consuming. For this reason the 'Global Template Implementation Tool' has been created to globally change all templates to a specific look and feel that takes out the need to edit each PowerSeek template to implement a specific design or look and feel. The global template implemented could contain your logo, graphics, headers, footers, CSS, etc. The 'global template' to be implemented mentioned here is just a normal HTML file containing your logo, graphics, headers, footers, CSS, etc. Once uploaded all PowerSeek templates automatically changes to the global template and all PowerSeek functions (like category displays, logins, search pages, etc.) are embedded with the global template HTML code. After the global template has been implemented, almost all PowerSeek templates will take on this look and feel. After the global template has been implemented you can then edit templates individually for specialized needs or other needs.
How to implement a Global Template:
PowerSeek uses HTML templates for the look and feel of your Search Engine & Directory. The templates can also be thought of as skins. All aspects of the templates can be customized to your liking. You can use any type of design. Note that PowerSeek uses no HTML code of it's own. It relies on the HTML code obtained from the templates to put everything together that end users see. The templates are ordinary HTML files.
You can edit all templates used for all end-user-functions PowerSeek provides by going to the PowerSeek Control Panel >> Template Manager
To implement a Global Template go to the PowerSeek Control Panel >> Template Manager >> Implement Global Template and follow the instructions provided to you.
After you implemented a Global Template you can come back to this section to find out how to customize specific templates for specific functions like the templates that are responsible for displaying links in categories, search results, login screens, Add URL forms, etc.
![]()
Everything displayed to end-users of your Directory and Search Engine is template driven. This makes it very flexible and customizable so that you can customize all text and HTML displayed to visitors. The templates can also be thought of as skins. To edit these templates or skins you may go to the ‘Template Manager’ in the Control Panel. Note that PowerSeek doesn't use any HTML code of it's own. All displays is taken from HTML templates and PowerSeek uses the HTML obtained from the templates to construct all user displays.
![]()
The templates that is used by PowerSeek is just ordinary HTML files. The only exception is that the templates or HTML files contains variable words that PowerSeek uses for pointers where it needs to place data. You can basically open the HTML files with your favorite web editor or with what ever you prefer and edit away. Some templates combine into each other to form an entire page. What this means is that some pages displayed to end users consist of more than one template.
![]()
 |
You can edit the templates from the Template Manager. To go to the Template Manager, go to the Control Panel and click the 'Template Manager' tab. Click on any of the template links in the Template Manager to edit templates.
Templates can be edited by copying and pasting the HTML code directly into your web editor when editing templates from the Template Manager. Once you have changed the template contents, you may copy and paste it back into the edit box and save it.
You may also open the template files directly with your web editor to edit them. The templates are stored inside your ‘data’ directory. You can get the file names from the ‘Template Manager’ inside the Control Panel when you click the 'Template Manager' tab and choose a template set to edit.
![]()
The variable words are enclosed by !! or %% characters. Examples of such variable words are:
%%date%% or %%pages%% etc...Variable words are replaced by chunks of data supplied by PowerSeek when users browse your Directory & Search Engine. The location of the variables in the HTML templates acts like pointers where PowerSeek substitutes the variable words with data.
For example:
%%date%% is replaced by the date of a link listing and %%pages%% are replaced by the number of pages that contains link listings, etc.
Note: It is very important that most of these variable words are present in your templates. Without them your Directory & Search Engine may not function correctly. Only remove variable words if you know what they do.
 |
![]()
To make use of images in the templates, you must use a URL link to indicate their locations. For example:
<img src="someimage.gif"> will not work. You have to indicate the entire URL where someimage.gif is located. For example:
<img src="http://www.yourdomain.com/someimage.gif">
![]()
This section explains how to customize the Default Directory Template set. The Default Directory Template set is used when displaying directories/categories with links.
|
|
You can customize the Default Directory Template set by going to the template manager in the control panel. Then click on 'Directory Template HTML code' or you can just manually open the HTML files and edit away. The location of the files are inside the 'data' directory where PowerSeek stores it's data files. The PowerSeek installation instructions covers the location of this directory.
The HTML files or templates used for the Default Directory Template Set is:
defdir.html
tmplsearch.html
tmplsearch_prem.html
subdirs.html
directories1.html
related1.html
related2.html
linkinfo.html
linkinfop.html
The above files are situated in the 'data' directory. The 'data' directory is explained in the installation instructions.
All the files above are combined into one (except linkinfo.html and linkinfop.html) when displaying the contents of directories/categories. Another way of saying this is to say that the above files are used in combination with each other to form one template or page that is used when displaying the contents of directories/categories. The combinations and details of these files is explained below.Explanation of each HTML file or template used in the Default Directory/Category Template Plug-In's
defdir.html (Directory Template)
This is the main template used when displaying the links/contents of your directories or categories.
This template and tmplsearch.html, tmplsearch_prem.html, subdirs.html, directories1.html, related1.html and related2.html is combined to form a category page.
tmplsearch.html
This template is used in conjunction with defdir.html - It is substituted by the %%searchresults%% variable in defdir.html - In other words, %%searchresults%% is replaced by the HTML code of tmplsearch.html in defdir.html
This template indicates the actual style of the link listings. The HTML code for this template is repeated for each link that is displayed in a category.
Note that <html> and <body> HTML tags must not be present in this template.
tmplsearch_prem.html
This template basically does the same thing that tmplsearch.html does, but it is only used for premium listings so that premium listings can have a different look or appearance.
Note that <html> and <body> must not be present in this template.
subdirs.html - Sub Directories/Categories Style 1
This template is used in conjunction with defdir.html - It is substituted by the %%subdirectories%% variable in defdir.html - In other words, %%subdirectories%% is replaced by the HTML code of subdirs.html in defdir.html
The HTML code of subdirs.html is used for displaying sub categories/directories of the current category/directory when browsing the directory.
Note that <html> and <body> must not be present in this template.
directories1.html - Sub Directory Link Style 2
This template is used in combination with subdirs.html - The function of this template is the actual style of each sub directory/category displayed. You can also add a graphic next to each subdirectory in this template if need be.
The variable %%substyle%% which is used in this template is replaced by actual directory/category names.
Let's say you want to add a graphic next to each category displayed. Then the contents of directories1.html would look something like this:
<img src="http://www.yourdomain.com/smpdirl.gif"> %%substyle%%
related1.html – Related Directories/Categories Style 1
This template is used to display related directories/categories for the directory/category. This template is used in combination with defdir.html
It is substituted by the %%related%% variable in defdir.html - In other words, %%related%% is replaced by the HTML code of related1.html in defdir.html
related2.html - Related Directories/Categories Style 2
This template is used in combination with related1.html - The function of this template is the actual style of each related directory/category displayed.
linkinfo.html - Extra link information for standard links
This template is used to create an individual page for each standard link in your Directory. This means that each link can have it’s own page.
If the variable !!more_info_url!! is present inside tmplsearch.html or tmplsearch_prem.html then each standard link displayed in your Directory will have a link to an extra page where the standard link information can also be displayed. You can for example display more extended information about the link on the extra page. The extended information could be contained in extra fields/keys.
linkinfop.html - Extra link information template for premium links
This template is used to create an individual page for each premium link in your Directory. This means that each premium link can have it’s own page.
If the variable !!more_info_url!! is present inside tmplsearch.html or tmplsearch_prem.html then each link displayed in your directory will have a link to an extra page where the link information can also be displayed. You can for example display more extended information about the link on the extra page. The extended information could be contained in extra fields/keys.
You can find out more about premium links here:
Chapter 10. Premium Links
![]()
A lot of the templates work in combination with each other and others work independently where they are not combined with other templates.
The rest of the templates work in more or less the same manner as explained in section 5.6. The moment you open (with your web editor) a template you should know or have a good idea where it is to be used.
The easiest and best way to know exactly how the templates work is to experiment and play around with them. If something went wrong and your Directory doesn’t seem to be working anymore because of template problems, you can just go back to the default templates that were present when you first installed PowerSeek. You can go back to the original templates by clicking the ‘Restore Default’ button when editing templates from the ‘Template Manager’.
Also look carefully at the templates that was present when PowerSeek was first installed to get a good idea of how they work and what each variable word does. You can find these in the .zip installation file under the 'data' directory.
![]()
 |
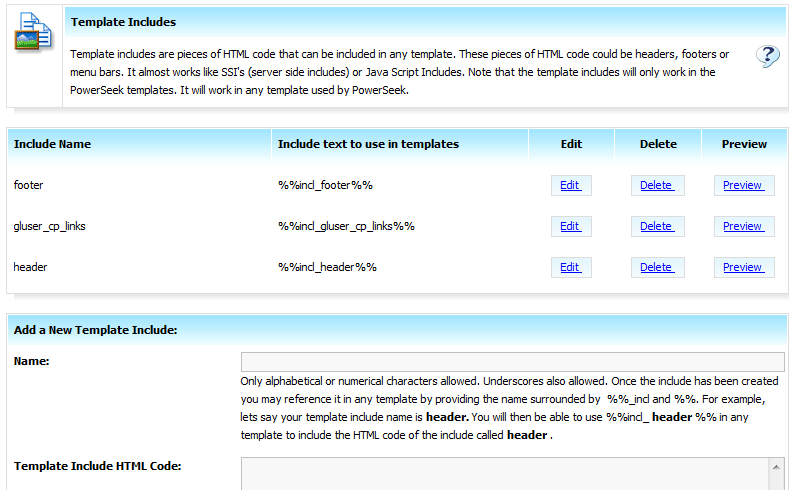
6.9.1 What is template includes?
Template Includes works with PowerSeek like SSI (server side includes) would work with a web server. Template includes is pieces of HTML code that you can include in any of the templates used by PowerSeek. The pieces of HTML code could be menu bars, footers, headers, search boxes, etc.
You could for example create a template include that will be a menu bar that you would like placed on the left side of all your Search Engine & Directory pages. Without template includes you would have to open each template and insert the menu bar. With template includes you just insert a variable word inside any template and the HTML code that is contained within the Template Include is replaced by the variable. In the event where something of your menu bar changes, you just edit the Template Include and the rest of the templates containing the menu bar via the Template Include changes. Note that if you run an HTML Generated (Static) Directory that you will need to regenerate HTML files if you have changed a Template Include.6.9.2 How to create a template include
Go to the Control Panel and click on the Template Manager tab. Now click on the ‘Create/Edit Template Includes’ link. A popup window will appear.
Go to the ‘Add New Template Include’ form in the popup window and enter a name and some text or HTML code to the text box. Then click the ‘Add new Template Include’ button.6.9.3 How to include Template Includes inside your templates
Template includes will be listed in the Template Include Popup Window when template includes has been added. With all the Template Include listings there will be a field or section that displays a PowerSeek variable. The variable is a word enclosed by %% characters. Use this variable inside any of your templates to include the contents of the Template Include in the templates of your choice. To use template includes inside your templates, go to the template manager and edit your templates by adding the include variable at the location where you would like the contents of the include to be displayed.
 |
![]()
PowerSeek variables are words enclosed by %% and !! characters.
Variable words are replaced by chunks of data supplied by PowerSeek when users browse your Search Engine & Directory. The location of the variables in the HTML templates acts like pointers where PowerSeek substitutes the variable words and/or data.
The following variables are available to all templates:!build_url!
This is always replaced by the URL path to the 'html' directory, or the directory where all generated HTML files are stored.
!!tseeksearch!!
This is always replaced by the URL path to the search CGI scripts. The search CGI scripts are the scripts that searches through your Directory when a visitor invokes a search.
!!add_url_link!!
This is always replaced by a URL path to the 'Add URL' form or the cgi script that displays the 'Add URL' form.
!!add_premium_url_link!!
This is always replaced by a URL path to the 'Premium Link Add URL' form or the cgi script that displays the 'Premium Link Add URL' form.
!!whatsnew!!
This is always replaced by a URL path to the page that indicates the latest link additions to your directory.
!!tophits!!
This is always replaced by a URL path to the page that indicates most popular links inside your directory.
!!modify_link_url!!
This is always replaced by a URL path to the modify CGI script that enable users to modify their links.!!register!!
This is replaced by a link to the registration form that visitors complete to register an account. Note that you have to use the user registration system.!!rgs_loginl!!
This is replaced by a link to the login page where visitors log into their accounts. (To add links or view/modify them)!!favorites_link!!
This is replaced by a link to the 'Favorites' page where a visitor can view links he/she flagged as his/her favorite links.
![]()
Custom Category/Directory Templates provide you with the ability to assign Custom Directory Templates to categories/directories of your choice. This means that you can give certain categories a total original look, or target advertisements at specific categories with text and images. The advertisements that you could target could be complex text or forms where banners would not work. You can also use the Text/HTML Ad Manager or Banner Ad Manager that comes with PowerSeek to rotate banners or Text/HTML based Adverts in directories/categories and search results.
 |
6.11.1 How to create custom template sets
To create a custom template set, go to the Control Panel. Then click on the ‘Template Manager’ tab. Click the ‘Create or Edit Custom Directory/Category Templates’ link. A popup window will appear. Now click on the ‘Add New Directory Template’ button.
Assign a name to the custom template you are about to create by filling in a name where asked for a name of the new custom directory template set. (Near the top of the window)
You will see Field Text Boxes that contains HTML code. The HTML code displayed here comes from the Default Directory Templates. The Default Directory Templates are: defdir.html, tmplsearch.html, tmplsearch_prem.html, subdirs.html, directories1.html, related1.html, related2.htm, linkinfo.html and linkinfop.html
Change the HTML code to your liking and click the 'Add New Custom Template Set' button.6.11.2 How to assign custom templates to directories/categories
Go to the ‘Dir Manager’. Browse your categories/directories in the ‘Dir Manager’ until you find a directory/category where you would like to use the Custom Template Set that you created in 5.10.1. Click on the ‘Default’ link displayed next to the category. A popup window will appear where you can assign the Custom Template set that you created to be used fro the category/directory.
![]()
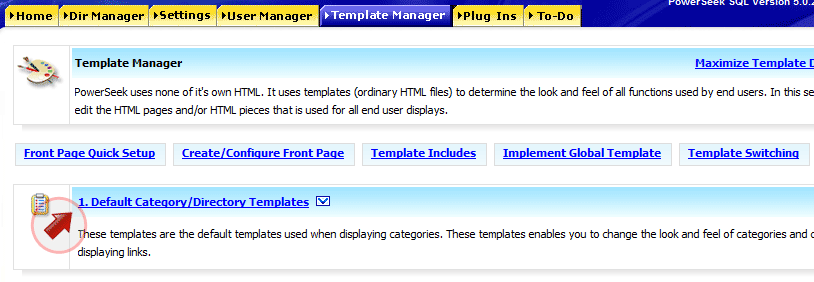 |
This section explains how to customize the Default Category/Directory Template set. The Default Category/Directory Template set is used when displaying categories with links.
You can customize the Default Directory Template set by going to the Template Manager in the Control Panel. Then click on '1. Default Category/Directory Templates'.
Explanation of each HTML file or template used in the Default Directory/Category Template Set :
Main Category/Directory - defdir.html
This is the main template used when displaying the links/contents of your Categories or Directories.
This template and tmplsearch.html, tmplsearch_prem.html, subdirs.html, directories1.html, related1.html and related2.html is combined to form a category page.
Links Style - tmplsearch.html
This template is used in conjunction with defdir.html - It is substituted by the %%searchresults%% variable in defdir.html - In other words, %%searchresults%% is replaced by the HTML code of tmplsearch.html in defdir.html
This template indicates the actual style of the link listings. The HTML code for this template is repeated for each link that is displayed in a Category.
Note that <html> and <body> must not be present in this template.
Premium Links Style - tmplsearch_prem.html
This template basically does the same thing that tmplsearch.html does, but it is only used for premium listings so that premium listings can have a different look or appearance.
Note that <html> and <body> must not be present in this template.
Sub Categories/Directories Style 1 - subdirs.html - Sub Directories/Categories Style 1
This template is used in conjunction with defdir.html - It is substituted by the %%subdirectories%% variable in defdir.html - In other words, %%subdirectories%% is replaced by the HTML code of subdirs.html in defdir.html
The HTML code of subdirs.html is used for displaying sub categories/directories of the current category/directory when browsing the directory.
Note that <html> and <body> must not be present in this template.
Sub Categories/Directories Style 2 - directories1.html - Sub Directory Link Style 2
This template is used in combination with subdirs.html - The function of this template is the actual style of each sub directory/category displayed. You can add a graphic next to each subdirectory in this template.
The variable %%substyle%% that is used in this template is replaced by actual category/directory names.
Let's say you want to add a graphic next to each category displayed. Then the contents of directories1.html would look something like this for example:
<img src="http://www.yourdomain.com/smpdirl.gif"> %%substyle%%
Note that <html> and <body> must not be present in this template.
Related Categories/Directories Style 1 - related1.html – Related Directories/Categories Style 1
This template is used to display related directories/categories for the existing directory/category. This template is used in combination with defdir.html
It is substituted by the %%related%% variable in defdir.html - In other words, %%related%% is replaced by the HTML code of related1.html in defdir.html
Related Categories/Directories Style 2 - related2.html - Related Directories/Categories Style 2
This template is used in combination with related1.html - The function of this template is the actual style of each related category/directory displayed.
Link Info - linkinfo.html - Extra link information template for standard links
This template is used to create an individual page for each standard link in your Directory. This means that each link can have it’s own page.
If the variable !!more_info_url!! is present inside tmplsearch.html or tmplsearch_prem.html then each link displayed in your directory will have a link to an extra page where more link information can also be displayed for example. You can for example display more extended information about the link on the extra page. The extended information could be contained in extra data fields.
Link Info Premium - linkinfop.html - Extra link information template for premium links
This template is used to create an individual page for each premium link in your Directory. This means that each premium link can have it’s own page.
If the variable !!more_info_url!! is present inside tmplsearch.html or tmplsearch_prem.html then each link displayed in your directory will have a link to an extra page where the link information can also be displayed. You can for example display more extended information about the link on the extra page. The extended information could be contained in extra fields/keys.
You can find out more about premium links here:
10. The Premium Links
![]()
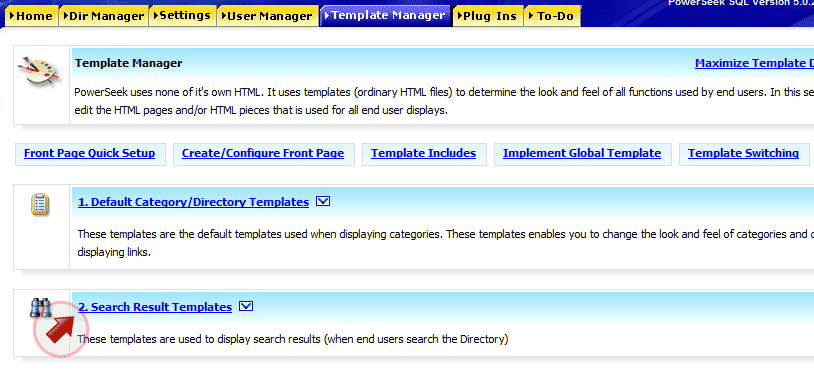 |
The templates that is used when displaying search results is: searchres.html, lsearchres_loc.html, lsearchres_loc_prem.html, searchadv.html, nomatch.html, flood.html, searchresdir.html, lsearchres_locdir.html
You can customize the Search Result Templates by going to the Template Manager in the Control Panel. Then click on '2. Search Result Templates'.
Below is an explanation of what each template does:
Main Search Page (searchres.html)
This is the main template that is used to display search results with. This template works in combination with lsearchres_loc.html, lsearchres_loc_prem.htmllsearchres_loc.html
This template indicates the link style of each link displayed in search results. This template is used in conjunction with searchres.html - It is substituted by the %%searchresults%% variable in searchres.htmllsearchres_loc_prem.html
This template indicates the link style of premium links displayed in search results. The style of this template will be used to indicate premium links inside search results. It works in almost the same way as lsearchres_loc.htmlAdvanced Search Page (searchadv.html)
This template is the main template that is used to provide your visitors with advanced search functions.Note that lsearchres_loc.html and lsearchres_loc_prem.html is used in combination with this template to display standard and premium links.No Match (nomatch.html)
This template will be displayed to end users when a match was not found when searching. This template does not work in combination with other templates.Flood Control Template (flood.html)
If you have flood control turned on then this template will be displayed when visitors try to flood the search. You can turn flood control on or off by going to the Control Panel >> Settings >> Global Engine Settings >> 4. Search Settings >> 'Would you like to use flood control?'Main Directory Search Page (searchresdir.html)
This template is the main template that is used for directory/category searches. It is used in combination with lsearchres_locdir.html which defines the style of displaying categories in the category search results.Directory Links Style (lsearchres_locdir.html)
This template is used to define the style of directories/categories that is displayed when doing category searches from the advanced search form.
Also See:
6.3 Template Basics
6.4 How to edit templates
6.5 What is the variable words in the templates/HTML files?
6.6 How to use images in templates
![]()
 |
From PowerSeek ver 3.x there are two sets of Add URL and Modify templates. One set is used when you are using the User Registration System and the other if you are not. When you use the user registration system, visitors need to register an account to be able to submit links. If you are not using it then visitors don't need to register an account to be able to post links. You can turn the use of the user registration system on or off by going to the Control Panel >> Settings >> Global Engine Settings >> 5. New Submission Settings
Also see: Chapter 8. The User Manager
6.14.1 User Registration Add URL & Modify templates
The following templates will be used when the user registration system is in use:
Account Creation & Account Template Plug Ins
Add URL Registration Message (rgs_msgregister.html)
This template/page will be displayed to a visitor if he/she is not logged in when trying to Add a URL.New User Registration (rgs_register.html)
This template is used to collect details from visitors registering new accounts.Successfully Registered (rgs_regsuccess.html)
This template is displayed to a visitor after he/she successfully created an accountAccount Activation Successful (rgs_actsuccess.html)
This template is displayed to a visitor after requesting that his/her re-activation email has been sent.Account Activation Failed (rgs_actfailed.html)
This template is displayed when there is a problem with account activation.Resend Account Activation Email (rgs_resend.html)
This template is displayed when a user chooses to have the account activation email resent to him/her.Account Activation Email Sent (rgs_sent.html)
This template is displayed when a user chooses to have the account activation email resent to him/her.User Login (rgs_login.html)
This template is displayed when a user chooses to login to his/her account.
User Log Out (rgs_logout.html)
This template is displayed when a user chooses to log out of his/her account.Password Retrieval Templates
These templates are used to retrieve user name and passwords.Retrieve Password (rgs_retrievepass.html)
This template is displayed when a user chooses to have his/her user name and password sent to his/her email address.
Retrieve Password Success (rgs_retrievepass_ok.html)
This template is displayed when a user has successfully requested that his/her password be sent to them.Control Panel Templates
These templates are displayed after a user logs into his/her account.Main Control Panel (rgs_cpmain.html)
This page is displayed when a user logs in. It also lists the links a user has added. A user can also modify his/her links from this page.Account Links Style (rgs_acclinks.html)
This template defines the style of links when displaying it inside the user account area.Account Premium Links Style (rgs_acclinksp.html)
This template defines the style of premium links when displaying it inside the user account area.No Links Display (rgs_nolinks.html)
If there are no links to display when a user logs in, then the contents of this template will be displayed. It will be replaced the !!user_links!! variable. If there are links then this template will not be displayed and the !!user_links!! will be replaced by the user's link listings.Account Editing Templates
These templates are used when a user wants to update his/her account details.Edit Account Details (rgs_editacc.html)
This template is used when a user edits/changes his/her account information.Successfully Saved Account Details (rgs_saveacc.html)
This template is displayed when a user has successfully edited/changed his/her account details.User Registration System Add URL Template Plug Ins
These templates are used when users submit links for inclusion into the Index.Note that there are two sets of Add URL forms you can use. For more on this, see:
9.1.1 Medium-Sized and Large-Sized Search Engines Add URL FormsNote that you can also have a Premium Add URL form where users can submit premium links. Also see:
9.1.2 Premium and Standard SubmissionsAdd URL Template 1 (rgs_add_url_med.html) (Medium-Sized Search Engines)
This template (when displayed to end users) comes with a drop down menu containing all the categories/directories where end users can select where they would like to submit their URL. This template is intended for medium-sized search engines with less than 5000 categories/directories. You can choose what 'Add URL' forms to use (medium or large-sized engines), in
Settings Tab >> Global Engine Settings >> New Submission Settings
Add URL Template 2 (rgs_add_url.html) (Large-Sized Search Engines)
This template (when displayed to end users) is intended to be used when you have more than 5000 categories/directories. It doesn't come with a category dropdown menu where categories can be chosen when doing a new submission. The reason for this is because having 10 000 categories in the drop down menu would make the add url form load very slowly. You can choose what add url forms to use (medium or large-sized engines), in the Settings Tab >> Global Engine Settings >> New Submission Settings
Paid Submission Add URL Template 1 (rgs_add_url_medp.html) (Medium-Sized Search Engines)
This template (when displayed to end users) is intended to be used when you have less than 5000 categories/directories. This template is used when users add premium Url's.
Paid Submission Add URL Template 2 (rgs_add_urlp.html) (Large-Sized Search Engines)
This template (when displayed to end users) is intended to be used when you have more than 5000 categories/directories. It is used to Add Premium Url's.
Add URL Instructions (rgs_add_url_instructions.html)
This template is used to indicate that a user have to be inside a category to add a URL. This template is only used when the Add URL forms of Large-Sized Search Engines is used. (rgs_add_url.html and rgs_add_urlp.html)
Locked Category/Directory (rgs_locked.html)
This template is displayed when a user tries to add a listing to a category that has been locked. Users cannot add listings to categories that has been locked. Categories can be locked by pressing the edit button next to a category when browsing the Dir Manager.
Problem Page (rgs_add_url_problem.html)
This template is displayed when a user tries to submit a listing but there was a problem adding the listing.
Success Page (rgs_add_url_success.html)
This template is displayed to a user who successfully added a URL or Premium URL.
Premium Add URL Order Form (Link to your order processor)
Here you can supply the link to your order processors order form when someone wants to purchase and add a premium listing. See the help section below for a better explanation.User Registration System Modify Template Plug Ins
These templates are used when users go through the process of modifying submitted links.Modify/Edit Link Standard (rgs_modify_link_edit.html)
This template is used to display standard link details that is about to be modified by the link owner.
Modify/Edit Link Premium (rgs_modify_link_editp.html)
This template is used to display premium link details that is about to be modified by the link owner.
Modify Link Problem (rgs_modify_link_problem.html)
This template is displayed when there was a problem while trying to modify a link.
Modify Link Success (rgs_modify_link_success.html)
This template is displayed when a link was successfully modified.
Modify/Edit Instructions (rgs_modify_instructions.html)
In the event where a user is not logged in and attempts to modify a link the the following template will be displayed to him/her.
6.14.2 Standard Add URL& Modify templates
The following templates will be used when the user registration system is not in use:
There are two sets of Add URL forms you can use. For more on this, see:
9.1 New Submissions
9.1.1 Medium-Sized and Large-Sized Search Engines Add URL FormsYou can also have a Premium Add URL form where users can submit premium links. Also see:
9.1.2 Premium and Standard SubmissionsIf you are going to use the medium-sized Add URL forms, then you will need to customize the following Add URL templates:
Add URL Template 1 (add_url_med.html) (Medium-Sized Search Engines)
This template (when displayed to end users) comes with a drop down menu containing all the categories/directories where end users can select where they would like to submit their URL.
Paid Submission Add URL Template 1 (add_url_medp.html) (Medium-Sized Search Engines)
This template (when displayed to end users) is intended to be used when you have less than 5000 categories/directories. It is also intended to be a Premium Add URL form where users submit premium URL's.
Locked Category/Directory (locked.html)
This template will be displayed to end users when they try to Add a URL to a category that is locked. You can lock categories from the 'Dir Manager' so that new submissions cannot be done in certain categories/directories. When using a the medium-sized Add URL templates, this template will normally not be used because the categories that are locked are not loaded in the drop down menu where users select the category to submit their URL.
Problem Page (add_url_problem.html)
This template is displayed to end users when they do a new submission but there was a problem. A problem will usually occur when a user left out to include his/her email address, etc.
Success Page (add_url_success.html)
This template is displayed to end users when a new submission has been successful.
Premium Add URL Order Form (Link to your order processor)
This is not a template but a URL that you specify to your order processor. If you are not going to use an order processor, create and ordinary HTML file indicating that a premium link submission has been successful. Then supply the URL to go to when a new premium submission has been made.If you are going to use the large-sized Add-URL forms, then you will need to customize the following Add URL templates:
Add URL Template 2 (add_url.html) (Large-Sized Search Engines)
This template (when displayed to end users) is intended to be used when you have more than 5000 categories/directories. It doesn't come with a category dropdown menu where categories can be chosen when doing a new submission. The reason for this is because having 10 000 categories in the drop down menu would make the add url form load very slowly.
Paid Submission Add URL Template 2 (add_urlp.html) (Large-Sized Search Engines)
This template (when displayed to end users) is intended to be used when you have more than 5000 categories/directories. It is also intended to be a Premium Add Url form where users submit premium URL's.
Add URL Instructions (add_url_instructions.html)
When using the large-sized search engine Add URL templates, end users need to click the Add URL link in a specific category/directory to add their URL/link. When they are not in a category and click the Add URL link, then this template will be displayed - giving them instructions on how to add their URL.
Locked Category/Directory (locked.html)
This template will be displayed to end-users when they try to add a URL to a category that is locked. You can lock categories from the 'Dir Manager' so that new submissions cannot be done in certain categories/directories.
Problem Page (add_url_problem.html)
This template is displayed to end users when they do new submissions where problems were found. A problem will usually occur when a user left out to include his/her email address, etc.
Success Page (add_url_success.html)
This template is displayed to end users when a new submission has been successful.
Premium Add URL Order Form (Link to your order processor)
This is not a template but a URL that you specify to your order processor. If you are not going to use an order processor, create and ordinary HTML file indicating that a premium link submission has been successful. Then supply the URL to go to when a new premium submission has been made.You will need to edit the following templates to customize the 'modify' templates.
Main Modify Link Page (modify_link.html)
This template is displayed to end-users when they click the 'Modify Link' available with each link listing. This template prompts them for the password to modify their link. Also see:
Modify Link Problem (modify_link_problem.html)
This template is displayed when there was a problem modifying a link.
Modify Link Success (modify_link_success.html)
This template is displayed when a link was successfully modified to indicate that it was successfully modified.
Modify/Edit Link Standard (modify_link_edit.html)
This is the template that enables users to submit changes to standard links.Modify/Edit Link Premium (modify_link_editp.html)
This is the template that enables users to submit changes to premium links.
Modify/Edit Instructions (modify_instructions.html)
This template will be displayed to users when the modify link is clicked but is not linked to a link listing. End-users will need to click the modify link available with each link listing to be able to modify links.
Retrieve Password (retrievepass.html)
This template is used to enable end-users to retrieve modification passwords for links.
Retrieve Password Success (retrievepass_ok.html)
Displayed to end-users when a modification password was successfully emailed to them.
Retrieve Password Problem (retrievepass_prb.html)
Displayed to end-users when a modification password could not be sent.Also See:
6.3 Template Basics
6.4 How to edit templates
6.5 What is the variable words in the templates/HTML files?
6.6 How to use images in templates
12.7 How to block automated submission services and spammers.
![]()
The Rating templates are used when users assign ratings to links on a scale from 1-10.
You will need to edit the following templates to customize the Rating templates:
Main Rating Page (rate_it.html)
This is the rating template with a form that enables end-users to cast a rating for a link.
Successfully Rated (rate_it_success.html)
This template is displayed to end-users when a rating has successfully been assigned to a link.
Failed Rating (rate_it_fail.html)
This template is displayed to end-users to inform them that they can only cast one rating per link.
Get HTML Code (gethtml.html)
This template is used to enable link owners to retrieve HTML code that they can place inside their web pages so that their visitors can rate their link.Also See:
6.3 Template Basics
6.4 How to edit templates
6.5 What is the variable words in the templates/HTML files?
6.6 How to use images in templates
![]()
The Review templates are used when end-users post comments or reviews about links.
You will need to edit the following templates to customize the Rating templates:
Main Comment/Review Page (review_it.html)
This template is used to enable end users to view and post reviews/comments about links.
Comment/Review Listings Style (reviewlinks.html)
This template is used to display comments/reviews. It is used in combination with review_it.html
Comment/Review Added (reviewadded.html)
This template displayed when an end-user successfully added a review/comment.
Comment/Review Problem (reviewproblem.html)
This template is displayed if there was a problem when trying to add a review/comment.Also See:
6.3 Template Basics
6.4 How to edit templates
6.5 What is the variable words in the templates/HTML files?
6.6 How to use images in templates
![]()
This set of templates is used for the 'What's New' page. The 'what's new' page lists new listings in the directory.
You will need to edit the following templates to customize the What's New templates:
Main What's New Page (whatsnew_main.html)
This template is used when displaying the latest additions to the directory. This template is used in combination with whatsnew_lists.html and whatsnew_lists_prem.html
What's New Listings Style (whatsnew_lists.html)
This template reflects the HTML code used when displaying new link listings. It is used in combination with whatsnew_main.html
What's New Listings Premium Style (whatsnew_lists_prem.html)
This template reflects the HTML code used when displaying new premium link listings. It is used in combination with whatsnew_main.htmlAlso See:
6.3 Template Basics
6.4 How to edit templates
6.5 What is the variable words in the templates/HTML files?
6.6 How to use images in templates
![]()
This set of templates is for the Top Hits page. The Top Hits page lists listings that received the most hits/clicks in your search engine & directory.
You will need to edit the following templates to customize the Top Hits templates:
Main Top Hits Page (tophits_main.html)
This template is used when displaying the most clicked links in the directory. It is used in combination with tophits_listings.html and tophits_listings_prem.html
Top Hits Listings Style (tophits_listings.html)
This template reflects the HTML code used when displaying the links that was most clicked. It is used in combination with tophits_main.html
Top Hits Listings Premium Style (tophits_listings_prem.html)
This template reflects the HTML code used when displaying premium links that was most clicked. It is used in combination with tophits_main.htmlAlso See:
6.3 Template Basics
6.4 How to edit templates
6.5 What is the variable words in the templates/HTML files?
6.6 How to use images in templates
![]()
This set of templates is displayed when end users report broken links.
You will need to edit the following templates to customize the Broken Link templates:
Broken Link Page (brokenlink.html)
This template will be displayed to end-users when they want to report a broken link.
Successfully Reported Broken Link Page (brokenlink_success.html)
This template is displayed to end-users when they successfully reported a broken link.Also See:
6.3 Template Basics
6.4 How to edit templates
6.5 What is the variable words in the templates/HTML files?
6.6 How to use images in templates
![]()
These templates are used when users want to unsubscribe from the mailing list. Each link owner can subscribe to the mailing list if they choose to do so when doing a new submission. They can also unsubscribe if they choose to do so. To retrieve only email addresses where end-users have chosen to subscribe to the mailing list, ensure that you check the check box called 'Only Users Who Ticked the Subscribe Box When They Made a Submission' when retrieving email addresses from the email retrieval utilities.
You will need to edit the following templates to customize the Mailing List Removal templates:
Mailing List Removal Template (mlist1.html)
This page/template is displayed to end-users when they are about to remove themselves from the mailing list.
Mailing List Removal Problem (mlist2.html)
This page/template is displayed to end-users when there was a problem removing their email address from the mailing list.
Mailing List Removal Success (mlist3.html)
This page/template is displayed to end-users when their email addresses was successfully removed from the mailing list.
Also See:
6.3 Template Basics
6.4 How to edit templates
6.5 What is the variable words in the templates/HTML files?
6.6 How to use images in templates
| << Previous Page Front Page Setup |
Index | Next Page >> How to run a static or dynamic directory. |
Last Updated: Monday September 08, 2025